Procedural city in OpenGL
Graphics, C++, OpenGL
April, 2022 - May, 2022
A city generated procedurally in a custom graphics engine. Project created in C++ using OpenGL.
This project consists of the procedural generation and
rendering of a cityusing the EDK3, an educational engine
developed by ESAT University. Along with my colleage
Carmen Martín Moreno,
we developed the graphic core of the engine using OpenGL and GLSL.
The repository of this project is private but temporary access may be
given to anyone interested in its implementation.
Contact me for more information.
What I did
- The lighting system and all shaders related to lighting.
- Postprocessing effects and use of framebuffers.
- Fog effect.
- Billboard of the light halos using the geometry shader.
- Implementation of classes to abstract the user from the OpenGL core such as Texture, Buffer, Shader, Material, etc.
Features
- Procedural generation of a city with buildings and streets.
- Fog and postprocessing effects such as bloom, blur, chromatic aberration.
- Creation and modification of pointlights, spotlights and directional light.
- Lighting system using forward rendering and the Phong model.
- Normal mapping.
- Camera culling.
- Generation of billboards and butterflies with geometry shader.
- First person camera to navigate the environment.
- Interface using ImGui to show stats, the hierarchy tree, manage and create lights, activate postprocessing, etc.
How I did it
Lighting system
I designed the lighting system as a manager object that would manage all the lights of the scene.
I created three light classes (directional light, spot light and point light) that can be placed in the scene and added to the scene hierarchy. These classes can only be instantiated by the LightManager to ensure that every light is tracked by the manager.
When rendering, the lights are passed to the LitMaterial object and their information is uploaded to the GPU when using that material. The camera position is also uploaded to calculate the specular reflection.
The LitMaterial uses a fragment shader that implements the Phong lightning model. Each light type
is calculated separatedly and then added together. The calculation of the value of each light is done taking into account the ambient, diffuse and specular colors of the light as well as the diffuse and specular textures of the material.
Due to the Phong model limitations, the max amount of lights in the scene are limited. As the cost of adding new lights escalates quickly.
Light halos using the geometry shader
When designing and implementing the lights, I wanted them to have the typical halo that
you see in videogames (and in real life). To do so, I had to have a quad in the same position
of the light with the texture of a halo. This quad had to be rotated each frame so that its forward vector was the opposite of the camera's forward vector.
I could not figure out how to do this on the CPU, as it generated many problems due to the architecture of the engine we were working on. As an alternative, I researched how geometry shaders worked (as I had a vague idea of what they did) and decided to try this way.
The final solution that I implemented was that each light had a HaloMaterial with a specific vertex, geometry and fragment shader. For each light, I uploaded their position as a single vertex to the vertex shader. Then, in the geometry shader, I used that point and the forward vector of the camera (passed as a uniform) to generate a quad that faced the camera. Finally, in the fragment shader I setted the halo texture to the quad.

Fog effect
I implemented the fog effect as an attribute of the LightingManager and can be parametrized through the manager. The fog is calculated using the exponential formula for the fog. The final color of the lit fragment shader is a mix between the color of the fog and the calculated color of the fragment.
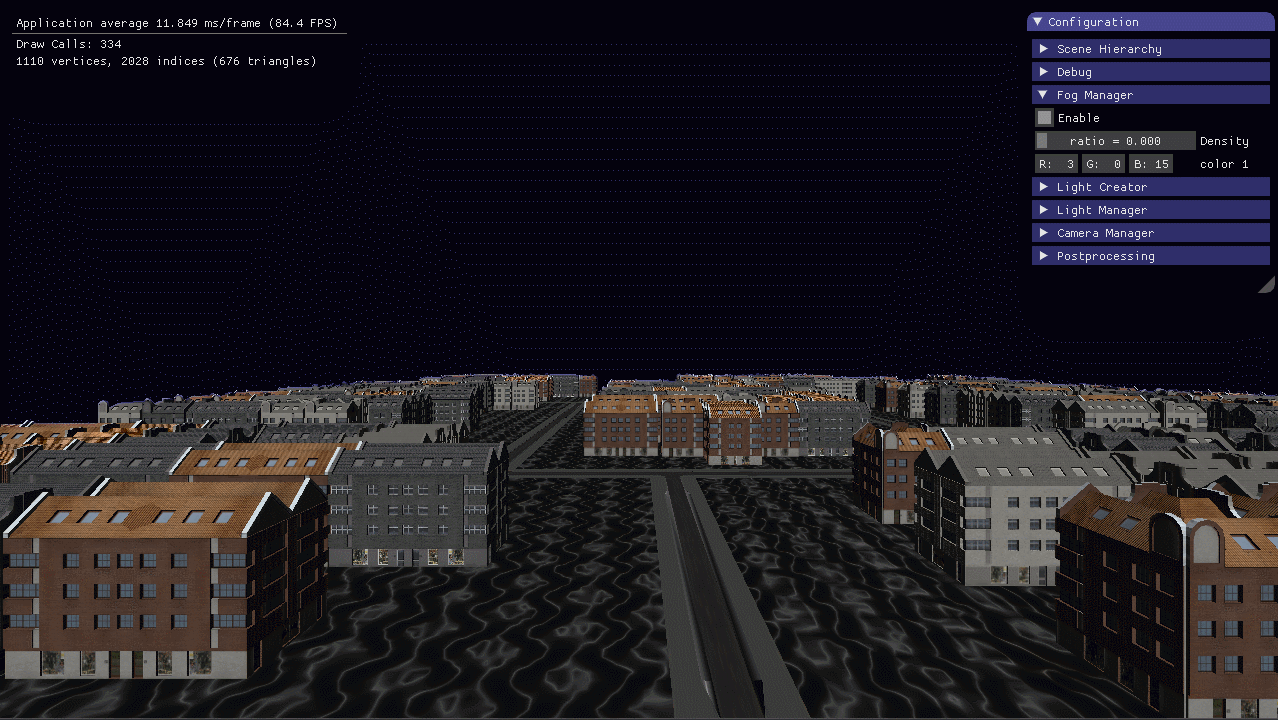
Postprocessing effects
I implemented all the postprocessing effects of the Engine, which are:
- Blur with a 5x5 gaussian kernel.
- Vignette.
- Chromatic Aberration.
- Bloom.
To create all the effects, I painted the scene into a FrameBuffer that contained an OpenGL RenderBuffer object and that had attached two textures to paint the frame on. One for the color of the scene and one for the depth of the scene.
Then I rendered a quad that occupies the whole screen and used the color texture to render the whole scene into the quad. During this pass, I applied the blur, vignette and chromatic aberration effects.
To apply the bloom effect, I used two textures to paint the image from one texture to the other several times, each time applying the bloom effect. The steps required to achieve this effect where:
- Bind the frame buffer with last texture used.
- Render the quad object applying the bloom shader, that performs a bloom pass, and store the render in an empty texture.
- Repeat steps 1-3 10 times.
- Render the final texture to show the final scene.